I thought this was a cool solution to let our Exchange users know their passwords are about to expire within 14 days, giving them an opportunity to change them before they do. Changing passwords is NOT possible out of the box via OWA with Exchange 2013....and I've seen quite a few sample scripts out there to try and cope with the same thing. Because it's enviable that somebody will be away, on vacation, or off on maternity leave, their password expires and now it's an urgent help desk call!
So...here's the script ....the heart of it really is the "msDS-UserPasswordExpiryTimeComputed" attribute that gets converted to an actual date. The current date is then subtracted to from the expirytime date to get the number of days remaining. A great blog post from Andreas helped me out here:
http://ahultgren.blogspot.com/2011/05/powershell-active-directory-and.html
Check it out...it explains the attribute calculations very well. So, all that get's wrapped up in a Foreach for every user parsed in your AD, and if the calculated days remaining are between 14 and 0, they'll get sent in email message via the Send-Mailmessage line at the bottom. Pop that into a scheduled task and you're good to go....
Ok tech peeps...hope this helps you out and results in happy exchange users!
*****************************************************************************
clear-host
Write-host "Script by DTopo 2014" -ForegroundColor Green
$ErrorActionPreference= 'silentlycontinue' # "needed to stop execution errors from displaying"
$adusers= Get-ADUser -filter ‘Enabled -eq $true -and PasswordNeverExpires -eq $false -and PasswordExpired -eq $false’ -SearchBase "OU=Users,OU=NY,DC=yourdomain,DC=com" -properties passwordlastset,passwordneverexpires,mail
foreach ($user in $adusers)
{$til = (([datetime]::FromFileTime((get-aduser $user -ErrorAction SilentlyContinue -properties "msDS-UserPasswordExpiryTimeComputed")."msDS-UserPasswordExpiryTimeComputed"))-(get-date)).days
if(($til -lt "14") -and ($til -gt 0)) {write-host $user.Name "last set their password on " $user.passwordlastset "it will expire again in " $til " days" -foregroundcolor cyan
$tpsuser=$user.Name
$emailaddress=$user.mail
echo $emailaddress
echo $tpsuser
$body =”
Dear $tpsuser,
<p> Your Windows/Email Password will expire in $til days!<br>
<br>
To change your password on a company PC, press CTRL ALT Delete and choose Change Password<br>
<br>
If you are not on a district PC, please login to your OWA webmail (https://mail.yourdomain.com/owa), click on the little gear in upper right corner-choose Options, then Settings, then Password<br>
<br>
NOTE: If you change your Windows/Email Password, you must also change it on your Mobile Device (iPhone, iPad, Android).<br>
<br>
**Also, if your password has already expired, you will NOT be able to use OWA to change it. You will then need to log on to a district PC.**<br>
<br>
<p>If you need assistance, please contact your building technician or call Technology...<br>
<br>
<br>
<p>Thank you.......<br>
<br>
Technology Department<br>
Your Company<br>
xxx-XXX-xxxx
</P>”
Send-Mailmessage -smtpServer mail.yourdomain.com -from noreply@yourdomain.com -to $emailaddress -Cc "somebody@yourdomain.com","somebodyelse@yourdomain.com" -subject "TPS Password will expire in $til days" -body $body -bodyasHTML -priority High -Verbose
}
}
Friday, May 16, 2014

Friday, April 18, 2014
Rename Exchange-AD User with Power Shell Script
This is probably not the most elegant PS script you'll ever see, and will most likely have experienced coders laughing and squirting milk from their noses (or whatever experienced coders drink) ...but hey..it works!
I searched quite a bit to find a script that would take care of all the attributes needed to rename a AD\Exchange user's surname, truncate it to fit our naming convention, rename their home directory, email addresses etc from the command line....all to no avail. So I pieced together what you see below. There's comments and echos for every function\ line, so it's easy to follow.
Now, I'm just waiting for somebody to get to get married so I can put this thing to work! Also, thanks to all the references (see comments in script) and their respective sites and authors that really helped me out....
I searched quite a bit to find a script that would take care of all the attributes needed to rename a AD\Exchange user's surname, truncate it to fit our naming convention, rename their home directory, email addresses etc from the command line....all to no avail. So I pieced together what you see below. There's comments and echos for every function\ line, so it's easy to follow.
Now, I'm just waiting for somebody to get to get married so I can put this thing to work! Also, thanks to all the references (see comments in script) and their respective sites and authors that really helped me out....
Function Begin {
Clear-Host
write-host "***********************************************************************" -ForegroundColor Red
Write-host "Script by created by Dennis Topo Jr 2014" -ForegroundColor Cyan
write-host "***********************************************************************" -ForegroundColor Red
write-host
$firstname=Read-Host "Enter current First name of user to be renamed (ie. John)"
write-host
$lastname=Read-Host "Enter current Last name of user to be renamed (ie. Smith)"
$fullname="$firstname" +" " + "$lastname"

get-aduser -Filter {name -eq $fullname}

$Choice=Read-Host "Do you want to rename the above user? (if you don't see any output, user is NOT in AD, or you typed it wrong!) Yes(Y) or No(N)?"
If (($Choice -eq 'Y') -or ($Choice -eq 'y')) {Prompt1}
if (($Choice -eq 'N') -or ($Choice -eq 'n')) {Begin}
Else {Begin}


}

Function Prompt1 {
write-host
$newsur=Read-host "Enter NEW Sur Name for User"
write-host

# set first initial of user account name
$firstsam=$firstname.substring(0,1)

# set CURRENT sur name to 7 chraraters only
# count the characters in the last name
$count=Measure-Object -InputObject $lastname -Character | select -expand Characters

# If the count is less than 7, use that number, if not, set it to 7
If ($count -lt 7 ){$numberx = $count}Else{$numberx = 7}
$sn7 = $lastname.Substring(0, $numberx)


$samaccount=$firstsam+$sn7


# set NEW sur name to 7 chraraters only
# count the characters in the last name
$count=Measure-Object -InputObject $newsur -Character | select -expand Characters

# If the count is less than 7, use that number, if not, set it to 7
If ($count -lt 7 ){$numberx = $count}Else{$numberx = 7}
$newsn7 = $newsur.Substring(0, $numberx)

write-host "***********************************************************************" -ForegroundColor Green
Write-Host "Echo out all the variables" -ForegroundColor Green
Write-Host
Write-Host
write-host "***********************************************************************" -ForegroundColor Yellow
$samaccount=$firstsam+$sn7
echo "Current Login Account is: $samaccount"

$newsam=$firstsam+$newsn7
echo "New Login Account is: $newsam"
write-host "***********************************************************************" -ForegroundColor Yellow

$curemail=$sn7+$firstsam+"@yourdomain.com"
echo "Current Primary Email is: $curemail"

$newemail=$newsn7+$firstsam+"@yourdomain.com"
echo "New Primary Email is: $newemail"
write-host "***********************************************************************" -ForegroundColor Yellow

$cursecemail=$firstsam+$sn7+"@yourdomain.com"
echo "Current Secondary Email is: $cursecemail"

$newsecemail=$firstsam+$newsn7+"@yourdomain.com"
echo "New Secondary Email is: $newsecemail"
write-host "***********************************************************************" -ForegroundColor Yellow

$newfullname="$firstname" +" " + "$newsur"
echo "New Name is: $newfullname"
write-host "***********************************************************************" -ForegroundColor Yellow

$newdisplayname="$newsur" +"," +" "+ "$firstname"
echo "New Display Name is: $newdisplayname"
write-host "***********************************************************************" -ForegroundColor Yellow

$newprinname="$newsam"+"@yourdomain.com"
echo "New Principle Name is: $newprinname"
write-host "***********************************************************************" -ForegroundColor Yellow

# Get's the users Home Directory
$hdir=get-aduser $samaccount -Properties homeDirectory | select -ExpandProperty homeDirectory
echo "Current Home Directory Path is: $hdir"

# Replace current Home Dir name with new one, which is the new sam account ie #$a = $a.Replace("Scriptign", "Scripting")
$newhdir=$hdir.Replace("$samaccount", "$newsam")
echo "New Home Directory Path is: $newhdir"
write-host "***********************************************************************" -ForegroundColor Yellow

$alias=$firstsam+$sn7
echo "Current Alias is: $alias"

$newalias=$firstsam+$newsn7
echo "New Alias is: $newalias"
write-host "***********************************************************************" -ForegroundColor Yellow

Exchange
}


Function Exchange {

pause
Write-Host "Create and Import PowerShell Session to Exchange Server" -ForegroundColor Green
$Session = New-PSSession -ConfigurationName Microsoft.Exchange -ConnectionUri http://exchange.yourdomain.com/PowerShell/ -Authentication Kerberos

 Import-PSSession $Session -AllowClobber   #By default, Import-PSSession imports all commands except for commands that have the same names as commands in the current session. To import all the commands, use the AllowClobber parameter.

 pause
 Write-Host "Disable Address Policy for Mailbox" -ForegroundColor Green
 Set-Mailbox -Identity $alias -EmailAddressPolicyEnabled $false

 pause
 Write-Host "Remove Current Secondary Email Address" -ForegroundColor Green
 Set-Mailbox -Identity $alias -EmailAddresses @{Remove="$cursecemail"}

 pause
 Write-Host "Rename User Object in AD" -ForegroundColor Green
 get-aduser $samaccount | Rename-ADObject -NewName "$newfullname"

 pause
 Write-Host "Change AD Attributes like Display Name, SAM Account, UPN, and EMail" -ForegroundColor Green
 get-aduser $samaccount |Set-ADUser -Surname $newsur -DisplayName "$newdisplayname" -SamAccountName $newsam -UserPrincipalName $newprinname -EmailAddress $newemail

 pause
 Write-Host "Set New Primary Address and Alias" -ForegroundColor Green
 Set-Mailbox -Identity $alias -PrimarySmtpAddress $newemail  -Alias $newalias

 pause
 Write-Host "Enable Address Policy for Mailbox" -ForegroundColor Green
 Set-Mailbox -Identity $newalias -EmailAddressPolicyEnabled $true

 pause
 Write-Host "Disable Address Policy for Mailbox" -ForegroundColor Green
 Set-Mailbox -Identity $newalias -EmailAddressPolicyEnabled $false

 pause
 Write-Host "Set New Secondary Email Address" -ForegroundColor Green
 Set-Mailbox -Identity $newalias -EmailAddresses $newsecemail

 pause
 Write-Host "Remove OLD Primary Email Address- Should not be necessary though. Setting Secondary Add above should clear out all addresses." -ForegroundColor Green
 Set-Mailbox -Identity $newalias -EmailAddresses @{Remove="$curemail"}

 pause
 Write-Host "Enable Address Policy for Mailbox" -ForegroundColor Green
 Set-Mailbox -Identity $newalias -EmailAddressPolicyEnabled $true

 pause
 Write-Host "Remove PS Session to Exchange" -ForegroundColor Green
 Get-PSSession | Remove-PSSession

 pause
 Write-Host "Set Home Directory Folder Path" -ForegroundColor Green
 Set-ADUser -Identity $newalias -HomeDirectory $newhdir -Verbose

 pause
 Write-Host "Rename Home Directory" -ForegroundColor Green
 Rename-Item -Path "$hdir" -NewName $newalias -Force -Verbose

 pause
 Write-Host "Renamed User Details" -ForegroundColor Green
 Get-ADUser $newalis -Properties * | FL CN,Company,DisplayName,DistinguishedName,EmailAddress,mailNickname,HomeDirectory,SamAccountName,proxyAddresses,UserPrincipalName

 pause

 Begin

}

# Reference
#$a = $a.Replace("Scriptign", "Scripting")
# http://exchangeserverpro.com/manually-configuring-email-addresses-for-exchange-server-2013-recipients-using-powershell/
# http://technet.microsoft.com/en-us/library/ee617225.aspx
# http://chinnychukwudozie.com/2013/11/18/renaming-ad-user-object-surname-property/
# http://dmitrysotnikov.wordpress.com/2010/08/13/manage-email-addresses-without-exchange-cmdlets/
# http://social.technet.microsoft.com/Forums/exchange/en-US/6e005cc5-de5a-4ed8-bb65-fd299e431d65/how-to-removing-x400-addresses-via-powershell?forum=exchangesvradminlegacy
# http://technet.microsoft.com/en-us/library/bb123794(v=exchg.150).aspx
#$addrs = $mbx.EmailAddresses | Where {$_.Prefixstring -ne "X400"}


Clear-Host

Begin
Saturday, March 22, 2014
Cisco ASA with WCCP redirect to Squid proxy
Getting traffic redirection\interception from my ASA to my Squid proxy caused me a significant amount of pain! There's a great deal of blog posts out there on how to achieve this transparent redirect, but all are just a little different. I'm sure a seasoned Linux guy would have gotten this all done much quicker..but that was not the case for me! There's so many nuances and variants of Linux, and different ways to do the same thing, it makes a single clear cut procedure unlikely.
Anyway....the reasoning to setup a transparent proxy at all is little cloudy. It would have been much easier to point my client browsers to the the Squid box, and be done with it. If you're a windows shop, and use AD and Group Policy- then this is easy! But who wants to take the easy route? )
Squid proxy is pretty cool...plus it's free and easy to install, and well documented on line. I also paired my Squid box with Squid guard, for content and url filtering- again free.
Here are the main article I used as a guide to install and setup Squid with Squid Guard. Thanks to the author at dancourses!
To start, I used CentOS 6.5 for my proxy OS....with a minimal desktop install option- I like to have some gui for Linux. I used the latest Squid build at the time- 3.4.x. My ASA is a 5520 running 8.4.2 version software. I'll also assume you have experience editing linux config files- the metheod is up to you...if you're a cool terminal-only guy, and want to use VI for everything, by all means- I like Webmin and GEdit myself!
Once you have Squid and Squid Guard up and working a conventional proxy - browsers pointing to the IP of the Squid box on port 3128...and want to setup a transparent redirect using Cisco's Web Cache Communication Protocol like I did, then read on.
My lab network is shown below- running in GNS3 - which is an amazing piece of software and essential for anybody in the networking field looking to gain knowledge or to simulate an environment for testing.
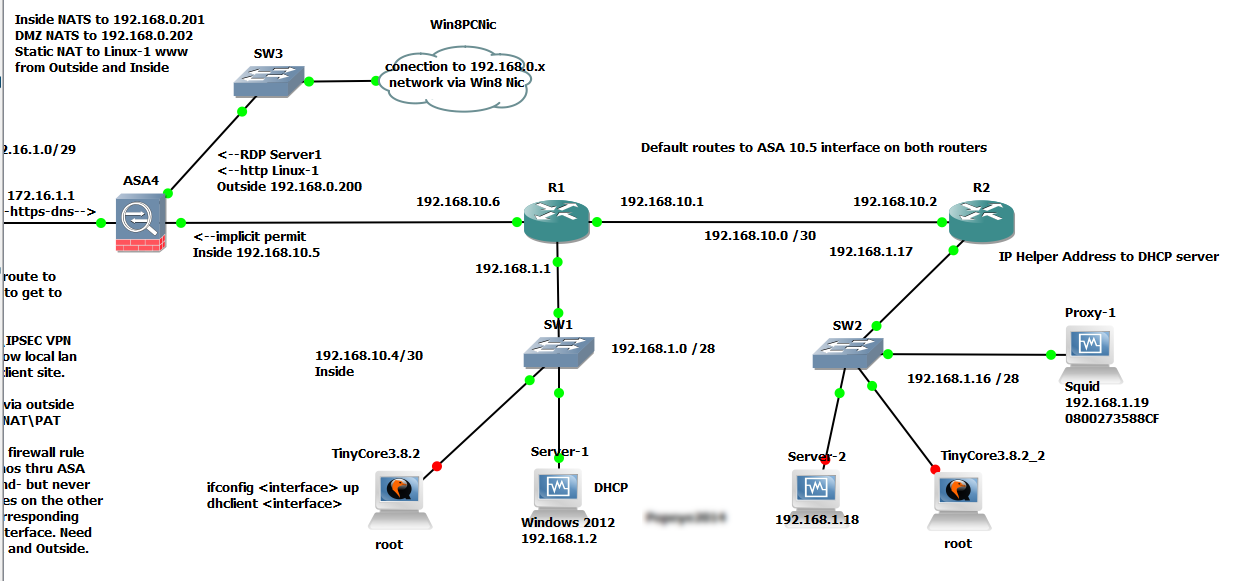
Obviously, ensure you have connectivity throughout your network and to the internet- we'll start with the ASA first.
Define the proxy server(s) that can register as a WCCP cache engine on the ASA , permit the subnets you want to be redirected, and deny your proxy server from being redirected.
access-list wccp-server extended permit ip host 192.168.1.19 any
access-list wccp-server remark Proxy servers that can register to WCCP
access-list wccp-traffic extended deny ip host 192.168.1.19 any
access-list wccp-traffic extended permit tcp 192.168.1.0 255.255.255.0 any eq www
access-list wccp-traffic extended permit tcp 192.168.1.0 255.255.255.0 any eq https
access-list wccp-traffic extended permit tcp 192.168.10.0 255.255.255.0 any eq www
access-list wccp-traffic extended permit tcp 192.168.10.0 255.255.255.0 any eq https
access-list wccp-traffic extended deny ip any any
access-list wccp-traffic remark Exclude proxy server from redirection- ID redirected subnets\clients
Next, tie in the WCCP config with the access lists you just created, and define the redirect interface, which would be your inside interface. Note that the proxy box and the clients must sit behind the same interface for this to work, per Cisco.
wccp web-cache redirect-list wccp-traffic group-list wccp-server
wccp interface inside web-cache redirect in
The other caveat with this is the WCCP Router ID....the ASA will pick the highest numbered IP to use as it's WCCP ID...this will be the source IP for the directed GRE packets coming from your ASA to your Squid proxy. So...it's probably best to design your IP scheme with this in mind...or else you'll have to ensure you have routes to any other interfaces that might be your WCCP ID. Mine is the inside interface at 192.168.10.5.
Next up- the squid.conf file....found in /etc/squid
I added these right at the end of the file. Note the intercept port- we'll use another port for that- 3129, and keep the stock 3128 port for normal proxying. Also, there's your WCCP Router ID IP.
# Intercept mode
http_port 3129 intercept
# WCCP Router IP- Inside ASA
wccp2_router 192.168.10.5
# forwarding
wccp2_forwarding_method gre
# GRE return method gre
wccp2_return_method gre
# standard web cache, no auth
wccp2_service standard 0
Now, restart Squid: service squid restart and it should register with the ASA.
On the ASA, do a show wccp and you should see that it has a cache engine (your squid box) registered.

Now for the OS adjustments on the Squid\CentOS box. I created a script called ifup-local in /sbin. In CentOS, this file is called when any interface is brought up. So just make it executable, and it will be fired up at system boot.
#!/bin/bash
# Setup and bring up the wccp\gre interface
modprobe ip_gre
ip tunnel add wccp0 mode gre remote 192.168.10.5 local 192.168.1.19 dev eth0
ifconfig wccp0 192.168.1.19 netmask 255.255.255.255 up
# disable rp_filter, or the packets will be silently discarded
echo 0 >/proc/sys/net/ipv4/conf/wccp0/rp_filter
echo 0 >/proc/sys/net/ipv4/conf/eth0/rp_filter
# enable ip-forwarding and redirect packets to squid
echo 1 >/proc/sys/net/ipv4/ip_forward
# catch the gre encapsulated http traffic-decapsulate it, and send it to Squid on port 3129
iptables -t nat -A PREROUTING -i wccp0 -p tcp --dport 80 -j DNAT --to-destination 192.168.1.19:3129
At this point, restart you Squid server. And go to a client browser...and hit the internet. The ASA should be catching your http requests, packing them up into GRE packets, and sending them to Squid. CentOS will encapsulate them, send them to Squid on port 3129. and then proxy the client requests as normal. And if you have Squid Guard, or another filtering application, you should be blocking content as well...won't that make your users happy!?
Here's a screen shot of a Wire Shark capture taken at eth0 of the Squid server when requesting a web site. The first TCP SYN packet is high lighted. You can see the GRE encapsulated header from the ASA there, with the request from the client to the web site server. The rest that follows set up the communication between the web site and the client with more SYNs and ACKs...then the actual HTTP GETs, requesting the content.

That's it! It is simple enough - just took me time to get the right config on the Linux side- the iptables command at the end, with the DNAT directive did it for me. The REDIRECT directive you may see on other blogs, did not work...it wasn't decapsulating the packets.
Additional reference for the Squid Wikis:
Sunday, February 9, 2014
Troubleshoot failed Incoming emails in Exchange 2013 with Symantec Mail Security for Exchange
I thought I'd put up some of my notes used to track and troubleshoot failures of incoming emails. Most recently, our hosted Exchange server seems to be the center of the universe! Yes...in the eyes of our users, all missed and non delivered emails are somehow the fault our server and department! The hardest thing is getting enough basic information from our users so we have even a chance at tracking down the reason why an incoming message didn't make to our server safe and sound. I this basic list to remind folks what they need to give me so I can target the problem.
Below are my notes in kind of a raw form- hopefully they prove usefully to somebody. This particular server hosts both the Mailbox and Client Access role...plus it's running Symantec Mail Security for Exchange-- so anything that makes it past the Connection Filtering agent (which checks incoming IPs wishing to connect to our server against our subscribed DNS Block lists) and the Default Front End receiver (all inbound SMTP mail), will subsequently be checked by the Symantec agents for content, viruses, etc.
I realize this is not the normal setup. Most shops would have some sort of edge device and or load balancer that would scan the incoming mail before it reaches the MBX server...but we have a "condensed" setup if you will. Although traffic is firewalled via our ISP before it reaches our box
What I'm checking for here is why emails from Adrad.com are not making it to our recipients- here's the sequence and logs I used to find the culprit!
· · Email Address of failed sender
· Date and Time the message was sent
· Email Address(es) of the intended recipient(s)
· A copy of the failed email message (if any)
· Bounce back message\NDR from intended recipient (if any)
· Attachment information: Size, File extension\type
· Any other error information relating to the sending PC (ie virus alerts, connection errors, etc.)
· Date and Time the message was sent
· Email Address(es) of the intended recipient(s)
· A copy of the failed email message (if any)
· Bounce back message\NDR from intended recipient (if any)
· Attachment information: Size, File extension\type
· Any other error information relating to the sending PC (ie virus alerts, connection errors, etc.)
Below are my notes in kind of a raw form- hopefully they prove usefully to somebody. This particular server hosts both the Mailbox and Client Access role...plus it's running Symantec Mail Security for Exchange-- so anything that makes it past the Connection Filtering agent (which checks incoming IPs wishing to connect to our server against our subscribed DNS Block lists) and the Default Front End receiver (all inbound SMTP mail), will subsequently be checked by the Symantec agents for content, viruses, etc.
I realize this is not the normal setup. Most shops would have some sort of edge device and or load balancer that would scan the incoming mail before it reaches the MBX server...but we have a "condensed" setup if you will. Although traffic is firewalled via our ISP before it reaches our box
What I'm checking for here is why emails from Adrad.com are not making it to our recipients- here's the sequence and logs I used to find the culprit!
Summary:
·
Exchange
Connection Filtering logs
C:\Program Files\Microsoft\Exchange
Server\V15\TransportRoles\Logs\FrontEnd\AgentLog
·
Front End
Receive Logs
C:\Program Files\Microsoft\Exchange
Server\V15\TransportRoles\Logs\FrontEnd\ProtocolLog\SmtpReceive
·
Message
Tracking logs
C:\Program
Files\Microsoft\Exchange Server\V15\TransportRoles\Logs\MessageTracking
·
Exchange
Server Application Log in Event Viewer (filter events to make log more manageable)
*********************************************************************************
Details:
Check the
following logs in this order- note that exchange log entries are all time
stamped in GMT time- so subtract 5 hours to get the adjusted military time for
our zone. (EST)
Exchange Connection
Filtering logs
C:\Program
Files\Microsoft\Exchange Server\V15\TransportRoles\Logs\FrontEnd\AgentLog
Check this log FIRST!
If the sending server is on one of our block lists, then
it's a done deal- won't go beyond here. Check the IP of the sending server from
the CF logs- see if it's on other block lists, including SPAM Cop and Spamhaus (our
lists) - in this case...adrad.com is
clean! No entries here…
Front End Receive
Logs
C:\Program
Files\Microsoft\Exchange
Server\V15\TransportRoles\Logs\FrontEnd\ProtocolLog\SmtpReceive
Check the Frontend
to see if the message is even getting to our server at all. Search on sender
and recipient email address and TIME
message was sent!! Nice to have the TIME! This is crucial unless you want to aimlessly search tons of logs!
Note: Will not
get subject here!
2014-01-14T16:20:36.117Z,EXCHANGE\Default
Frontend EXCHANGE,08D0DAE814F1B85F,0,10.38.187.3:25,170.163.48.241:52202,+,,
2014-01-14T16:20:36.117Z,EXCHANGE\Default
Frontend
EXCHANGE,08D0DAE814F1B85F,1,10.38.187.3:25,170.163.48.241:52202,*,SMTPSubmit
SMTPAcceptAnySender SMTPAcceptAuthoritativeDomainSender
AcceptRoutingHeaders,Set Session Permissions
2014-01-14T16:20:36.117Z,EXCHANGE\Default
Frontend
EXCHANGE,08D0DAE814F1B85F,2,10.38.187.3:25,170.163.48.241:52202,>,"220
EXCHANGE.ourdomain.net Microsoft ESMTP MAIL Service ready at Tue, 14 Jan 2014
11:20:35 -0500",
2014-01-14T16:20:36.133Z,EXCHANGE\Default
Frontend
EXCHANGE,08D0DAE814F1B85F,3,10.38.187.3:25,170.163.48.241:52202,<,HELO
wlfd1-sophos01.adrad.com,
2014-01-14T16:20:36.133Z,EXCHANGE\Default
Frontend EXCHANGE,08D0DAE814F1B85F,4,10.38.187.3:25,170.163.48.241:52202,>,250
EXCHANGE.ourdomain.net Hello [170.163.48.241],
2014-01-14T16:20:36.164Z,EXCHANGE\Default
Frontend
EXCHANGE,08D0DAE814F1B85F,5,10.38.187.3:25,170.163.48.241:52202,<,MAIL
FROM:<gina.coffin@adrad.com>,
2014-01-14T16:20:36.164Z,EXCHANGE\Default
Frontend
EXCHANGE,08D0DAE814F1B85F,6,10.38.187.3:25,170.163.48.241:52202,*,08D0DAE814F1B85F;2014-01-14T16:20:36.117Z;1,receiving
message
2014-01-14T16:20:36.164Z,EXCHANGE\Default
Frontend EXCHANGE,08D0DAE814F1B85F,7,10.38.187.3:25,170.163.48.241:52202,>,250
2.1.0 Sender OK,
2014-01-14T16:20:36.180Z,EXCHANGE\Default
Frontend
EXCHANGE,08D0DAE814F1B85F,8,10.38.187.3:25,170.163.48.241:52202,<,RCPT
TO:<gibsonj@ourdomain.net>,
2014-01-14T16:20:36.180Z,EXCHANGE\Default
Frontend EXCHANGE,08D0DAE814F1B85F,9,10.38.187.3:25,170.163.48.241:52202,>,250
2.1.5 Recipient OK,
2014-01-14T16:20:36.195Z,EXCHANGE\Default
Frontend
EXCHANGE,08D0DAE814F1B85F,10,10.38.187.3:25,170.163.48.241:52202,<,RCPT
TO:<neumeyeJ@ourdomain.net>,
2014-01-14T16:20:36.211Z,EXCHANGE\Default
Frontend
EXCHANGE,08D0DAE814F1B85F,11,10.38.187.3:25,170.163.48.241:52202,>,250 2.1.5
Recipient OK,
2014-01-14T16:20:36.227Z,EXCHANGE\Default
Frontend
EXCHANGE,08D0DAE814F1B85F,12,10.38.187.3:25,170.163.48.241:52202,<,DATA,
2014-01-14T16:20:36.227Z,EXCHANGE\Default
Frontend
EXCHANGE,08D0DAE814F1B85F,13,10.38.187.3:25,170.163.48.241:52202,>,354 Start
mail input; end with <CRLF>.<CRLF>,
2014-01-14T16:20:36.242Z,EXCHANGE\Default
Frontend EXCHANGE,08D0DAE814F1B85F,14,10.38.187.3:25,170.163.48.241:52202,*,,Proxy
destination(s) obtained from OnProxyInboundMessage event
Message Tracking logs
C:\Program Files\Microsoft\Exchange
Server\V15\TransportRoles\Logs\MessageTracking
On to the Hub Transport service. Search on sender and
recipient email addresses with TIME frame- look for "Agent,Fail"
Then you'll get the message subject here, and Agent that's involved...but
still no reason or match list term
(SMSMSE)
2014-01-14T16:20:36.305Z,,,,EXCHANGE,No
suitable shadow servers,,SMTP,HAREDIRECTFAIL,7292854469256,<0AE889256C2C3D4483EA9B8508D89C970C939D29@TRMB1-MSV01EXCH.addomain1.adrad.com>,027a9e0d-7900-41d1-74d5-08d0df5bb0ef,gibsonj@ourdomain.net;neumeyeJ@ourdomain.net,,20165,2,,,FW:
ASE - GAME On - Monday,gina.coffin@adrad.com,gina.coffin@adrad.com,,Undefined,,,,S:DeliveryPriority=Normal
2014-01-14T16:20:36.570Z,172.16.240.11,EXCHANGE.ourdomain.net,172.16.240.11,EXCHANGE,08D0DAE7F4D6A13E;2014-01-14T16:19:00.680Z;0,EXCHANGE\Default
EXCHANGE,SMTP,RECEIVE,7292854469256,<0AE889256C2C3D4483EA9B8508D89C970C939D29@TRMB1-MSV01EXCH.addomain1.adrad.com>,027a9e0d-7900-41d1-74d5-08d0df5bb0ef,gibsonj@ourdomain.net;neumeyeJ@ourdomain.net,,20165,2,,,FW:
ASE - GAME On - Monday,gina.coffin@adrad.com,gina.coffin@adrad.com,0cA:
,Undefined,,170.163.48.241,10.38.187.3,S:FirstForestHop=EXCHANGE.ourdomain.net;S:ProxiedClientIPAddress=64.95.41.162;S:ProxiedClientHostname=eworker077.msgbsvc.com;S:ProxyHop1=EXCHANGE.ourdomain.net(10.38.187.3);S:DeliveryPriority=Normal
2014-01-14T16:20:36.602Z,,EXCHANGE,,,SMSMSERoutingAgent,,AGENT,FAIL,7292854469256,<0AE889256C2C3D4483EA9B8508D89C970C939D29@TRMB1-MSV01EXCH.addomain1.adrad.com>,027a9e0d-7900-41d1-74d5-08d0df5bb0ef,gibsonj@ourdomain.net,'550
4.3.2 QUEUE.TransportAgent; message deleted by transport agent',20165,1,,,FW: ASE - GAME On - Monday,gina.coffin@adrad.com,gina.coffin@adrad.com,2014-01-14T16:20:36.164Z;SRV=EXCHANGE.ourdomain.net:TOTAL=0;SRV=EXCHANGE.ourdomain.net:TOTAL=0;CAT|CATSM|CATSM-SMSMSERoutingAgent,Undefined,,,,S:E2ELatency=0;S:DeliveryPriority=Normal
2014-01-14T16:20:36.602Z,,EXCHANGE,,,SMSMSERoutingAgent,,AGENT,FAIL,7292854469256,<0AE889256C2C3D4483EA9B8508D89C970C939D29@TRMB1-MSV01EXCH.addomain1.adrad.com>,027a9e0d-7900-41d1-74d5-08d0df5bb0ef,neumeyeJ@ourdomain.net,'550
4.3.2 QUEUE.TransportAgent; message
deleted by transport agent',20165,1,,,FW: ASE - GAME On - Monday,gina.coffin@adrad.com,gina.coffin@adrad.com,2014-01-14T16:20:36.164Z;SRV=EXCHANGE.ourdomain.net:TOTAL=0;SRV=EXCHANGE.ourdomain.net:TOTAL=0;CAT|CATSM|CATSM-SMSMSERoutingAgent,Undefined,,,,S:E2ELatency=0;S:DeliveryPriority=Normal
Exchange Server Application Log in Event Viewer: (Symantec reports in the console suck- useless! Don't
bother)
Search for message subject you got from
the Message Tracking logs, then you can
get the reason for the violation\deletion and the match list term.
In this case it's - "you have received this
email" (Matchlist name : Sample Message Body Words)
And there you go- You found the reason for the deletion….
Log
Name: Application
Source: Symantec Mail Security for Microsoft
Exchange
Date: 1/14/2014 11:21:20 AM
Event
ID: 291
Task
Category: Content Enforcement Rules
Level: Warning
Keywords: Classic
User: N/A
Computer: EXCHANGE.ourdomain.net
Description:
The message
"FW: ASE - GAME On -
Monday" located in SMTP has violated the following policy settings:
Scan: Auto-Protect
Rule: TPS Body
Violating term(s):
you have received this email (Matchlist name : Sample Message Body Words)
The
following actions were taken on it:
The message "FW: ASE - GAME
On - Monday" was marked
for Deletion for the following reason(s):
A
Filtering Rule was violated.
Friday, January 10, 2014
Sysprep and Domain Join Over Wireless
We all know that there's a host of different ways and technologies available to mass deploy PCs, but thought I'd go over what I've recently done to prep a roll-out of new laptops for my organization. My main objective was to get these set up and configured on the wireless- no hard wires! So that will be my focus of this post.
These will be win 7 units, so sysprep is involved. Although we are a MS shop, we have not used WDS and MDT to any real extent. Still sticking to Ghost, being that we have a heavy investment of ghost images already.
Since I wanted the machines to join one of our SSIDs automatically at post image startup- this is what I came up with.
First, you join a machine to the SSID of choice, and use the Netsh wlan command to export your WLan profile to a config file
A great resouce for the syntax and options can be found here: http://technet.microsoft.com/en-us/library/cc755301(v=ws.10).aspx#bkmk_wlanExportProf
netsh wlan export profile folder= "C:\Wireless\MyWlanProfile.xml"
You can check existing profiles you have with the show profiles command
netsh wlan show profiles
Now you have your exported xml file that looks something like this:
<?xml version="1.0" ?>
<name>MyWlanProfile</name>
<connectionType>ESS</connectionType>
<connectionMode>auto</connectionMode>
</WLANProfile>
What you'll need to do is change your very long WPA2 key material string to the clear text key that matches your pass phrase. And...change the protected tag to false. Reason being, after importing the file, you won't be able to connect on a different laptop other than the one you originally created the file on. And actually, that didn't even work for me. Obviously, your WPA2 phrase sitting around in clear text is not desirable..so we'll take care of that later in the process.
Next, I placed my xml file in a folder on the c drive of my imaging model laptop. I simply restricted access to the folder and xml file to only the system and administrator accounts- no access for anything else.
Now- -to import your file at the miniset up after you've modeled your image unit and ran sysprep, you can use the FirstLogonCommands as shown below. You'll have 2 netsh wlan lines- one to import the Profile from the profile xml file your exported earlier, and one to connect to your SSID.
<FirstLogonCommands>
<SynchronousCommand wcm:action="add">
<CommandLine>netsh wlan add profile filename="C:\wireless\MyWlanProfile.xml
</CommandLine>
<RequiresUserInput>false</RequiresUserInput>
<Order>1</Order>
<Description>Add MyWLanProfile</Description>
</SynchronousCommand>
<SynchronousCommand wcm:action="add">
<CommandLine>netsh wlan connect name="MySSID"</CommandLine>
<RequiresUserInput>false</RequiresUserInput>
<Order>2</Order>
<Description>Connect MyWLanProfile Profile</Description>
</SynchronousCommand>
</FirstLogonCommands>
What you'll need to do is change your very long WPA2 key material string to the clear text key that matches your pass phrase. And...change the protected tag to false. Reason being, after importing the file, you won't be able to connect on a different laptop other than the one you originally created the file on. And actually, that didn't even work for me. Obviously, your WPA2 phrase sitting around in clear text is not desirable..so we'll take care of that later in the process.
Next, I placed my xml file in a folder on the c drive of my imaging model laptop. I simply restricted access to the folder and xml file to only the system and administrator accounts- no access for anything else.
Now- -to import your file at the miniset up after you've modeled your image unit and ran sysprep, you can use the FirstLogonCommands as shown below. You'll have 2 netsh wlan lines- one to import the Profile from the profile xml file your exported earlier, and one to connect to your SSID.
<FirstLogonCommands>
<SynchronousCommand wcm:action="add">
<CommandLine>netsh wlan add profile filename="C:\wireless\MyWlanProfile.xml
</CommandLine>
<RequiresUserInput>false</RequiresUserInput>
<Order>1</Order>
<Description>Add MyWLanProfile</Description>
</SynchronousCommand>
<SynchronousCommand wcm:action="add">
<CommandLine>netsh wlan connect name="MySSID"</CommandLine>
<RequiresUserInput>false</RequiresUserInput>
<Order>2</Order>
<Description>Connect MyWLanProfile Profile</Description>
</SynchronousCommand>
</FirstLogonCommands>
I have an auto login directive in my unattend.xml file- the machine will login as the local administrator and the FirstLogonCommands will execute before the desktop is presented.
Now...what if you want to join the domain, or activate windows etc at mini-setup? Well you could put those commands here in the above FirstLogonCommands of your unattend.xml right? Well, they won't work. Not if your only network connection is the Wlan. The thing is, even though the Netsh commands are executed before the desktop appears, the wireless network connection does not connect until the desktop is loaded...which is well after the FirstLogonCommands execute. At least this was my experience.
And what about the %WINDIR%\Setup\Scripts\SetupComplete.cmd that mini-setup will execute if it exists? Same thing-- it executes too early- before the WLan is connected.
What I did was add a setupcomplete.cmd file to the Startup folder of the local administrator account as I was modeling the image unit.....pre-sysprep. (Path below on Win7)
"%userprofile%\AppData\Roaming\Microsoft\Windows\Start Menu\Programs\startup
With the script in the Startup folder, it will get execute AFTER the desktop sets up- which is what we want. Below is my file....I added ping delays to slow down the script down in places....giving it time to get the WLan connected before executing commands that are dependent on the network.
echo off
echo 30 Second Delay
ping 1.1.1.1 -n 1 -w 30000 >NUL
echo.
echo.
echo Join Domain
netdom.exe join %computername% /Domain:yourdomain.com /UserD:user1 /PasswordD:password
echo.
echo.
echo Activate Windows
ping 1.1.1.1 -n 1 -w 5000 >NUL
cscript c:\windows\system32\slmgr.vbs /ato
echo Activate Office
ping 1.1.1.1 -n 1 -w 5000 >NUL
cscript "c:\Program Files (x86)\Microsoft Office\Office14\ospp.vbs" /act
echo.
echo.
echo "Note: If setup script is not deleted from the Startup folder of the Default user profile
echo "for whatever reason, it will get copied to, and run on all subsequent user logins!"
echo.
echo.
ping 1.1.1.1 -n 1 -w 7000 >NUL
echo Remove Startup Scripts and Restart
shutdown -r -t 60
echo Deleting SetupComplete.cmd from Default Profile
ping 1.1.1.1 -n 1 -w 5000 >NUL
del "C:\Users\Default\AppData\Roaming\Microsoft\Windows\Start Menu\Programs\Startup\*.*" /F /Q
echo Deleting MyWlanProfile.xml
ping 1.1.1.1 -n 1 -w 5000 >NUL
del C:\wireless\MyWlanProfile.xml /F /Q
echo Deleting SetupComplete.cmd from Current Profile
ping 1.1.1.1 -n 1 -w 5000 >NUL
del "%userprofile%\AppData\Roaming\Microsoft\Windows\Start Menu\Programs\startup\*.*" /F /Q
Exit
Some things to note: I use Netdom to join the domain- I could never get my unattend.xml to do it-- even with a wired connection.
You'll want to have those delete lines at the end to cover your tracks so to speak and get rid of the sensitive setup files from prying eyes. The last one being the SetupComplete.cmd file itself
Now...what if you want to join the domain, or activate windows etc at mini-setup? Well you could put those commands here in the above FirstLogonCommands of your unattend.xml right? Well, they won't work. Not if your only network connection is the Wlan. The thing is, even though the Netsh commands are executed before the desktop appears, the wireless network connection does not connect until the desktop is loaded...which is well after the FirstLogonCommands execute. At least this was my experience.
And what about the %WINDIR%\Setup\Scripts\SetupComplete.cmd that mini-setup will execute if it exists? Same thing-- it executes too early- before the WLan is connected.
What I did was add a setupcomplete.cmd file to the Startup folder of the local administrator account as I was modeling the image unit.....pre-sysprep. (Path below on Win7)
"%userprofile%\AppData\Roaming\Microsoft\Windows\Start Menu\Programs\startup
With the script in the Startup folder, it will get execute AFTER the desktop sets up- which is what we want. Below is my file....I added ping delays to slow down the script down in places....giving it time to get the WLan connected before executing commands that are dependent on the network.
echo off
echo 30 Second Delay
ping 1.1.1.1 -n 1 -w 30000 >NUL
echo.
echo.
echo Join Domain
netdom.exe join %computername% /Domain:yourdomain.com /UserD:user1 /PasswordD:password
echo.
echo.
echo Activate Windows
ping 1.1.1.1 -n 1 -w 5000 >NUL
cscript c:\windows\system32\slmgr.vbs /ato
echo Activate Office
ping 1.1.1.1 -n 1 -w 5000 >NUL
cscript "c:\Program Files (x86)\Microsoft Office\Office14\ospp.vbs" /act
echo.
echo.
echo "Note: If setup script is not deleted from the Startup folder of the Default user profile
echo "for whatever reason, it will get copied to, and run on all subsequent user logins!"
echo.
echo.
ping 1.1.1.1 -n 1 -w 7000 >NUL
echo Remove Startup Scripts and Restart
shutdown -r -t 60
echo Deleting SetupComplete.cmd from Default Profile
ping 1.1.1.1 -n 1 -w 5000 >NUL
del "C:\Users\Default\AppData\Roaming\Microsoft\Windows\Start Menu\Programs\Startup\*.*" /F /Q
echo Deleting MyWlanProfile.xml
ping 1.1.1.1 -n 1 -w 5000 >NUL
del C:\wireless\MyWlanProfile.xml /F /Q
echo Deleting SetupComplete.cmd from Current Profile
ping 1.1.1.1 -n 1 -w 5000 >NUL
del "%userprofile%\AppData\Roaming\Microsoft\Windows\Start Menu\Programs\startup\*.*" /F /Q
Exit
Some things to note: I use Netdom to join the domain- I could never get my unattend.xml to do it-- even with a wired connection.
You'll want to have those delete lines at the end to cover your tracks so to speak and get rid of the sensitive setup files from prying eyes. The last one being the SetupComplete.cmd file itself
Saturday, January 4, 2014
SIP SoftPhone Registration with Cisco CME
This I'm sure this is no revelation to seasoned Cisco voice engineers, but for those just building their skills, I wanted to put out a little how to for attaching and registering SIP softphones to your Cisco Call Manger Express router.
I've integrated many Cisco phones with CME using the native SCCP protocol- Cisco's native signaling and communications protocol otherwise known as Skinny for short.
Assuming all your prerequisite router\CME configurations are in place.... ie...interfaces, tftp-server phone loads files for your phone types, dhcp pool, telephony-service entries etc..... you would add the MAC address of the SCCP phone under the corresponding ephone section of your router config...like so
ephone 1
mac-address 0021.A075.D474
after-hours exempt
paging-dn 30
type 7941
button 1:1 2:21
pin 1111
This ephone would have a matching ephone-dn section to define the line for the ephone (or skinny phone)...like this:
ephone-dn 1 dual-line
number 1001
label Tony Montana
name Tony Montana
But SIP phones require similar configurations under similar sections, but with different syntax.
First you need to allow sip to sip connections under voice service voip
voice service voip
allow-connections sip to sip
Also...do not forget this part--as I did! You need to turn on the registrar for SIP...so the sip phones have something to register to. Add this to your voice service voip section
sip
registrar server expires max 600 min 60 turns on the SIP registrar!
Next you'll add your global configuration lines under voice register global- this would be similar to the telephony-service section used for SCCP phones
voice register global
mode cme
source-address 192.168.0.254 port 5060
max-dn 5
max-pool 5
authenticate register optional for remote phones- digest authentication is used-don't use if you want to use MAC address authentication
authenticate realm mydomain.local
timezone 13
voicemail 2222
tftp-path flash:
create profile sync 0025196614655748
Note the create profile command-this command builds the sip cnf and xml SIP phone files in the path specified by the tftp-path command above it. The sync xxxxxxxx.. is appended automatically by the IOS. I'll come back to the authenticate register command later.
Now, you'll define your dn and line number with the voice register dn # command...like this
voice register dn 1
number 1041
allow watch
name 3cxOffice
label 3cxOffice
mwi
Next, you'll tie the actual phone to the DN with the
voice register pool 1
id mac 0000.0000.0000 Not relevant when using digest authentication- if not, put actual MAC here
number 1041
allow watch
name 3cxOffice
label 3cxOffice
mwi
Next, you'll tie the actual phone to the DN with the
voice register pool 1
id mac 0000.0000.0000 Not relevant when using digest authentication- if not, put actual MAC here
number 1 dn 1
presence call-list
dtmf-relay rtp-nte
username 1041 password cisco Digest Authentication
codec g711ulaw
Now...if you use the authenticate register option in your global settings (see above), you will NOT be able to authenticate your phone via mac address as you normally would a SCCP phone. This option makes the id mac line your voice register pool section irrelevant. This, from what I understand, tells your phone to use Digest Authentication...hence the user name and password. This would normally be used for remote phones- phones not connected on the same lan....due to ARP not passing the MAC of the remote device across routers- makes sense! An excellent explanation can be found here: thanks to the author )
presence call-list
dtmf-relay rtp-nte
username 1041 password cisco Digest Authentication
codec g711ulaw
Now...if you use the authenticate register option in your global settings (see above), you will NOT be able to authenticate your phone via mac address as you normally would a SCCP phone. This option makes the id mac line your voice register pool section irrelevant. This, from what I understand, tells your phone to use Digest Authentication...hence the user name and password. This would normally be used for remote phones- phones not connected on the same lan....due to ARP not passing the MAC of the remote device across routers- makes sense! An excellent explanation can be found here: thanks to the author )
So,,,there you have it. If all is straight, you should see your SIP phones register now. You can check it with this command- you would see similar to the output below
Line
destination
expires(sec) contact
transport
call-id
peer
============================================================
1041
192.168.0.38
85 192.168.0.38
UDP
YTE0MTBjNjk0YTVhZDFiNWQ2NzEwMjk5MWE0Nzg0NWM.
40001
Or, you can check them like this too:
show voice register dial-peer
Dial-peers
for Pool 1:
dial-peer
voice 40001 voip
destination-pattern
1041
session
target ipv4:192.168.0.38:64375
session
protocol
sipv2
dtmf-relay
rtp-nte
codec
g711ulaw bytes 160
after-hours-exempt
FALSE
Subscribe to:
Posts (Atom)